Best Value & Quality Solar Energy Solutions. How do you install solar panels? Bayville, NJ. For Free Consultation Dial us at Call (732) 907-8400
We also provide free solar consultation in the following cities
- How do you install solar panels? Lavallette, NJ
- How do you install solar panels? Lanoka Harbor, NJ
- How do you install solar panels? Lakewood, NJ
- How do you install solar panels? Paterson, NJ
- How do you install solar panels? Cream Ridge, NJ
- How do you install solar panels? Beachwood, NJ
- How do you install solar panels? Forked River, NJ
- How do you install solar panels? Browns Mills, NJ
- How do you install solar panels? New Egypt, NJ
- How do you install solar panels? Pine Beach, NJ
- How do you install solar panels? Seaside Heights, NJ
- How do you install solar panels? Howell, NJ
- How do you install solar panels? Lakehurst, NJ
- How do you install solar panels? Cookstown, NJ
- How do you install solar panels? Island Heights, NJ
- How do you install solar panels? Edison, NJ
- How do you install solar panels? Woodbridge, NJ
- How do you install solar panels? Lakewood, NJ
- How do you install solar panels? Newark, NJ
- How do you install solar panels? Clifton, NJ
Bayville is an unincorporated community located within Berkeley Township in Ocean County, New Jersey, United States.[5] The area is served as United States Postal Service ZIP Code 08721. As of the 2010 United States Census, the population for ZIP Code Tabulation Area (ZCTA) 08721 was 20,512.[1]Central Regional High School is the local high school for the area.
Bayville is an unincorporated community located within Berkeley Township in Ocean County, New Jersey, United States.[5] The area is served as United States Postal Service ZIP Code 08721. As of the 2010 United States Census, the population for ZIP Code Tabulation Area (ZCTA) 08721 was 20,512.[1]Central Regional High School is the local high school for the area.
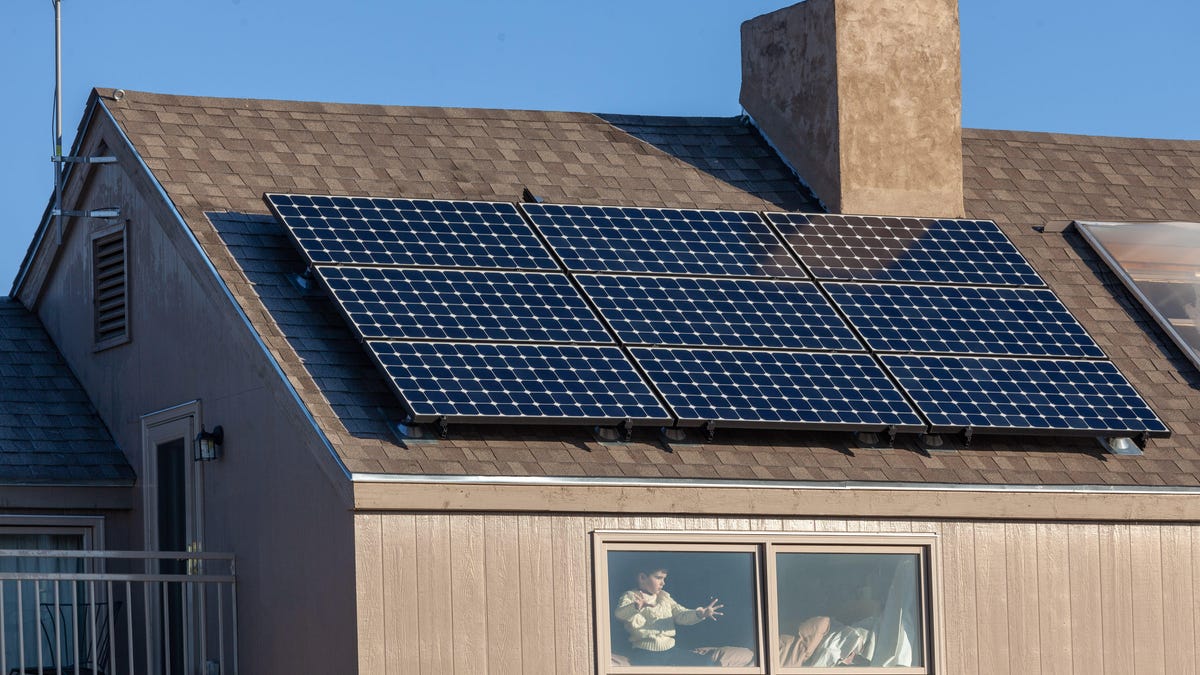
Installing a solar system is simple, but it does require some time as well as power. Here are a few helpful hints that will make the procedure go extra smoothly and also in less time than you believe: Ensure you have adequate room. The system needs to be set up on a south-facing wall surface for ideal efficiency. You additionally require at least 6 inches of roofing space above the panel area to allow for air flow and access for upkeep. Solar panels will certainly take up regarding 300 to 400 square feet of area, so check your home before acquiring. Also, keep in mind that each panel will certainly impact your residence’s appearance as well; so even if you do not have enough area for the system, it might not be the ideal place for it either. Consider what kind of inverter will work best for you. The majority of people pick in between an inverter that has a built-in battery back-up and one that does not. The advantage to going with a battery-powered system is that it will remain powered as long as there is the sunlight beaming on it, even if your power goes out for a couple of hours in the evening or throughout storms. With this type of system, there is no need to use an expansion cord, and also will run extra smoothly throughout the day due to less strain on your electrical system.
Just how are solar panels set up on a roofing system?
The solar panels are mounted by starting point them on the roof covering and after that mounting them on a metal shelf. The shelfs are bolted to the roofing system in order to prevent them from falling off throughout a storm. When everything prepares, the inverter is attached before the panels start feeding power into your home.
Photovoltaic Panel Installation Process
The very first step to mounting your planetary system is locating the right location. This can be a hard process, so seeking advice from a specialist is advised. After you pick a suitable place, it’s time to clean the panel and also gather every one of the needed tools and materials. You will certainly need a steak blade (or any type of thin, sharp blade), gloves, tape measure, wire cutters, a drill with bits and also screws, a screwdriver with bits for bolts from each producer’s guidelines, utility knife for reducing plastic tubes that comes with your set, set of Philips head screwdrivers (if relevant), energy blade for opening cardboard boxes and getting rid of packing material. After you’re all set to install your panels, adhere to these steps: 1) Measure your roofing for height as well as distance around it. 2) Locate where you intend to mount the panels on your roof covering; make sure they are placed as though they have no shade from each various other or anything else in your yard (like bushes or trees). 3) Drill openings through the top of the installing brackets making use of a 1/8 ″ bit to permit air flow into your attic room space. The holes need to be 3-5 inches deep and also spaced about 2 feet apart. You wish to prevent drilling through any type of existing wires or pipelines in order to protect against damage to them while installing your panels. See to it there is enough area in between the top of each panel and the roof above it. 4) Use wire connections or zip
Photovoltaic Panel Mounting Options
There are three major choices for mounting a solar system: the ground, the roofing system, and also free-standing. Free-standing panels have their own mounting systems that can be utilized to mount them on the roof or on top of a wall surface. Roof panels need you to utilize scaffolding or a placing system particularly designed for solar installations. Ground installs are fantastic for areas where there isn’t sufficient rooftop room readily available. Mount your system as soon as possible after acquisition. It takes concerning one month for a complete system setup from start to finish; so it’s best to save yourself the hassle by installing it prior to you require it. Additionally, remember that guarantees usually run out in concerning 8 years; so if you plan on marketing your home in 8 years, the service warranty will certainly most likely run out as well, making the installment process harder than if you hadn’t installed it early.
Exactly how To Future-Proof Your Solar Panel Installation
When mounting solar, it’s vital to think about the future. Installing a solar panel system is not something you want to delay till later because it is pricey to buy and also install brand-new panels every few years. To avoid this costly mistake, see to it you plan in advance by thinking about the following: -Install your system with sufficient capacity for as long as feasible. You’ll additionally intend to do a yearly examination on your current system so that you understand how much capacity you have. -If you stay in a location that obtains a lot of rainfall or snow, make certain to purchase the proper coverings for your system before installation. -Consider adding batteries if your inverter is not compatible with battery storage space.
The Amount Of Solar PV Panels Are Needed To Power A House?
A solar energy system is a financial investment, so it’s important to recognize just how much a solar panel system will certainly cost as well as how much electrical energy it will create. To determine the variety of panels required for your house, you need to recognize the details type of solar energy system you desire in addition to the quantity of electricity you require. Solar power systems differ from basic setups with 1 or 2 panels to a lot more intricate systems with 20 or even more panels. The typical residence requirements between 5 and also 10 panels, relying on the dimension of your roofing.